

Studio Tour
Studio is where you build. One window, a 3D view in the middle, and panels around it for everything else.
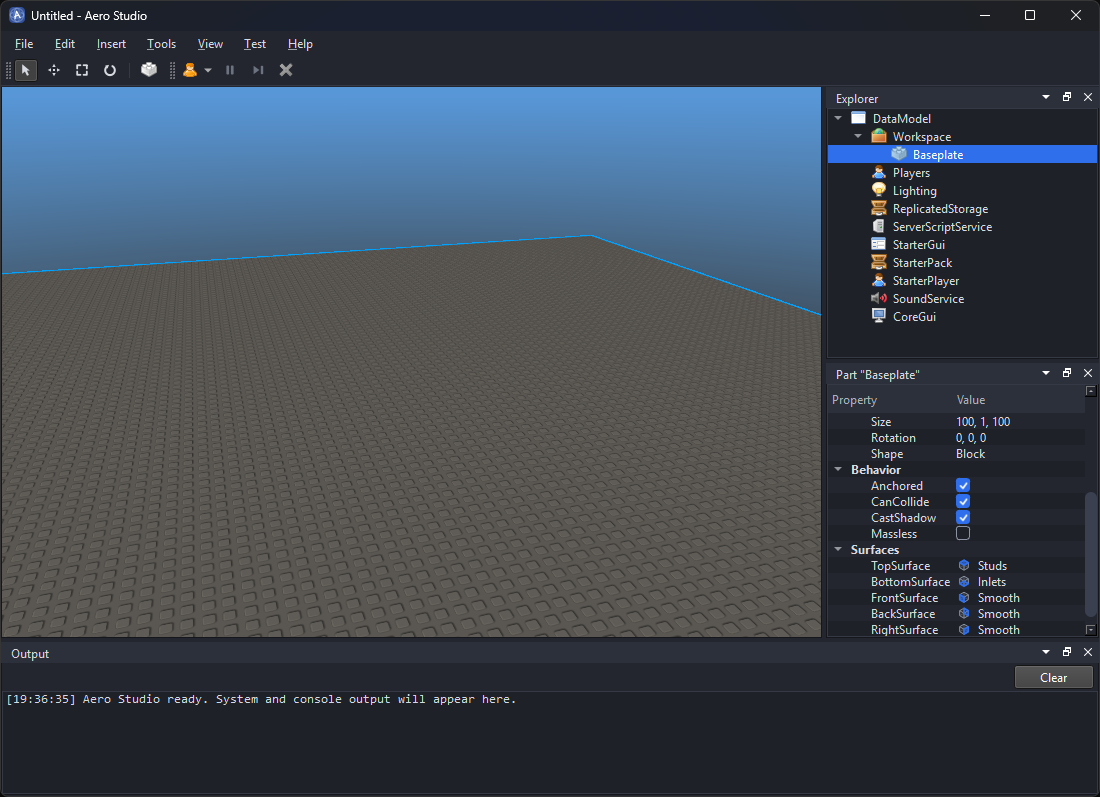
The panels
The viewport takes up the center. This is your place, rendered live. Click parts to select them and drag to move them. Scripts open as tabs over the viewport.
The Explorer sits on the right. It lists everything in the place as a tree. Right click anything for options.
Properties sits next to the Explorer. It shows the settings of whatever you selected. Change a number or a color and the viewport updates right away.
Output runs along the bottom. Script errors and printed messages show up here. Double click a line that mentions a script and Studio jumps straight to it.
The Insert palette hides on the left until you need it. Press Ctrl+I to open it, search for what you want, then drag it into the viewport or the Explorer.
The toolbar
The top bar holds the tools you will use constantly.
Select, Move, Scale, and Rotate change how dragging behaves. Keys 1 through 4 switch between them fast.
Play starts a full test with everything running. Run starts a server only test with no player character. Pause freezes the test. Reset ends it and puts your place back exactly how it was. Step moves one frame at a time while paused.
Undo and Redo cover place edits, so you can experiment freely. Each one selects the parts it changed, so you can carry on with them right away.
Saving and files
The File menu has New, Open, Save, Save As, and Place History. A new place stays called Untitled until you save it.
Studio keeps track of unsaved changes and asks before you throw them away. It also saves a backup copy in the background, so if Studio ever closes unexpectedly it will offer to recover your work. Recent places are listed under File if you want to jump back in.
Place History records a version of the open place whenever you open it, save it, autosave, or start a playtest. Open File > Place History to see your versions with the newest first, along with what changed between each one and the version before it. You can search by checkpoint name or time, or use the All, Checkpoints, and Playtests filters to narrow things down. When you select a version, Studio counts what restoring it would add, remove, and change. The place diff groups those changes together, like “3 PointLight under Workspace.Light”. A comparison switch lets you check a version against the one before it or against your current place.
Place files use the .aepl extension, and you never need to open one outside Studio.
Sometimes opening a file shows a Place Repaired message. It lists what Studio dropped or moved to get the file to load, and gives you the choice of Save Now or Later. You can wait on saving, but servers won’t run the place until it’s saved with the fixes.
Copying and inserting
Cut, Copy, Paste, Paste Into, Duplicate, and Delete work the way you’d expect. Paste and Duplicate put copies next to the originals, while Paste Into drops the clipboard inside the selected object instead. Press F to frame the selected part in the viewport.
To add something new, open the Insert palette and pick what you need. Parts and models go into the world, scripts open in the editor right away, and interface objects land where they belong on screen.
View and settings
View switches the viewport between Lit, Unlit, and Wireframe, and toggles a small diagnostics readout.
Edit holds Settings and Keyboard Shortcuts. Both apply the moment you change them. There is no restart step.
Under Help you will find About. It names your exact build and source commit. Quote those in a bug report. Studio comes in a dark and a light theme, and you can rearrange the panels under View.
Where to go next
Work through Your first place to build and script something small, then read Testing your place. Browse the API Reference when you start adding behavior to your place.